> ## Documentation Index
> Fetch the complete documentation index at: https://docs.h0p.co/llms.txt
> Use this file to discover all available pages before exploring further.
# Custom Domains
> Use your own domain for branded short links
Custom domains let you create short links using your own branded URL instead of `h0p.co`. Turn `h0p.co/my-link` into `links.yourcompany.com/my-link` for a professional, trustworthy appearance.
## Why use custom domains?
Your domain reinforces your brand identity with every link shared.
Visitors are more likely to click links from familiar domains.
Filter analytics by domain to track performance across different brands or campaigns.
Custom domains signal professionalism to partners and customers.
## Adding a custom domain
Decide which subdomain to use. Common choices:
* `links.yourcompany.com`
* `go.yourcompany.com`
* `l.yourcompany.com`
You can also use a root domain like `short.co`, but subdomains are easier to configure.
Go to **Domains** in the sidebar and click **Add Domain**.
Enter your full domain (e.g., `links.yourcompany.com`).
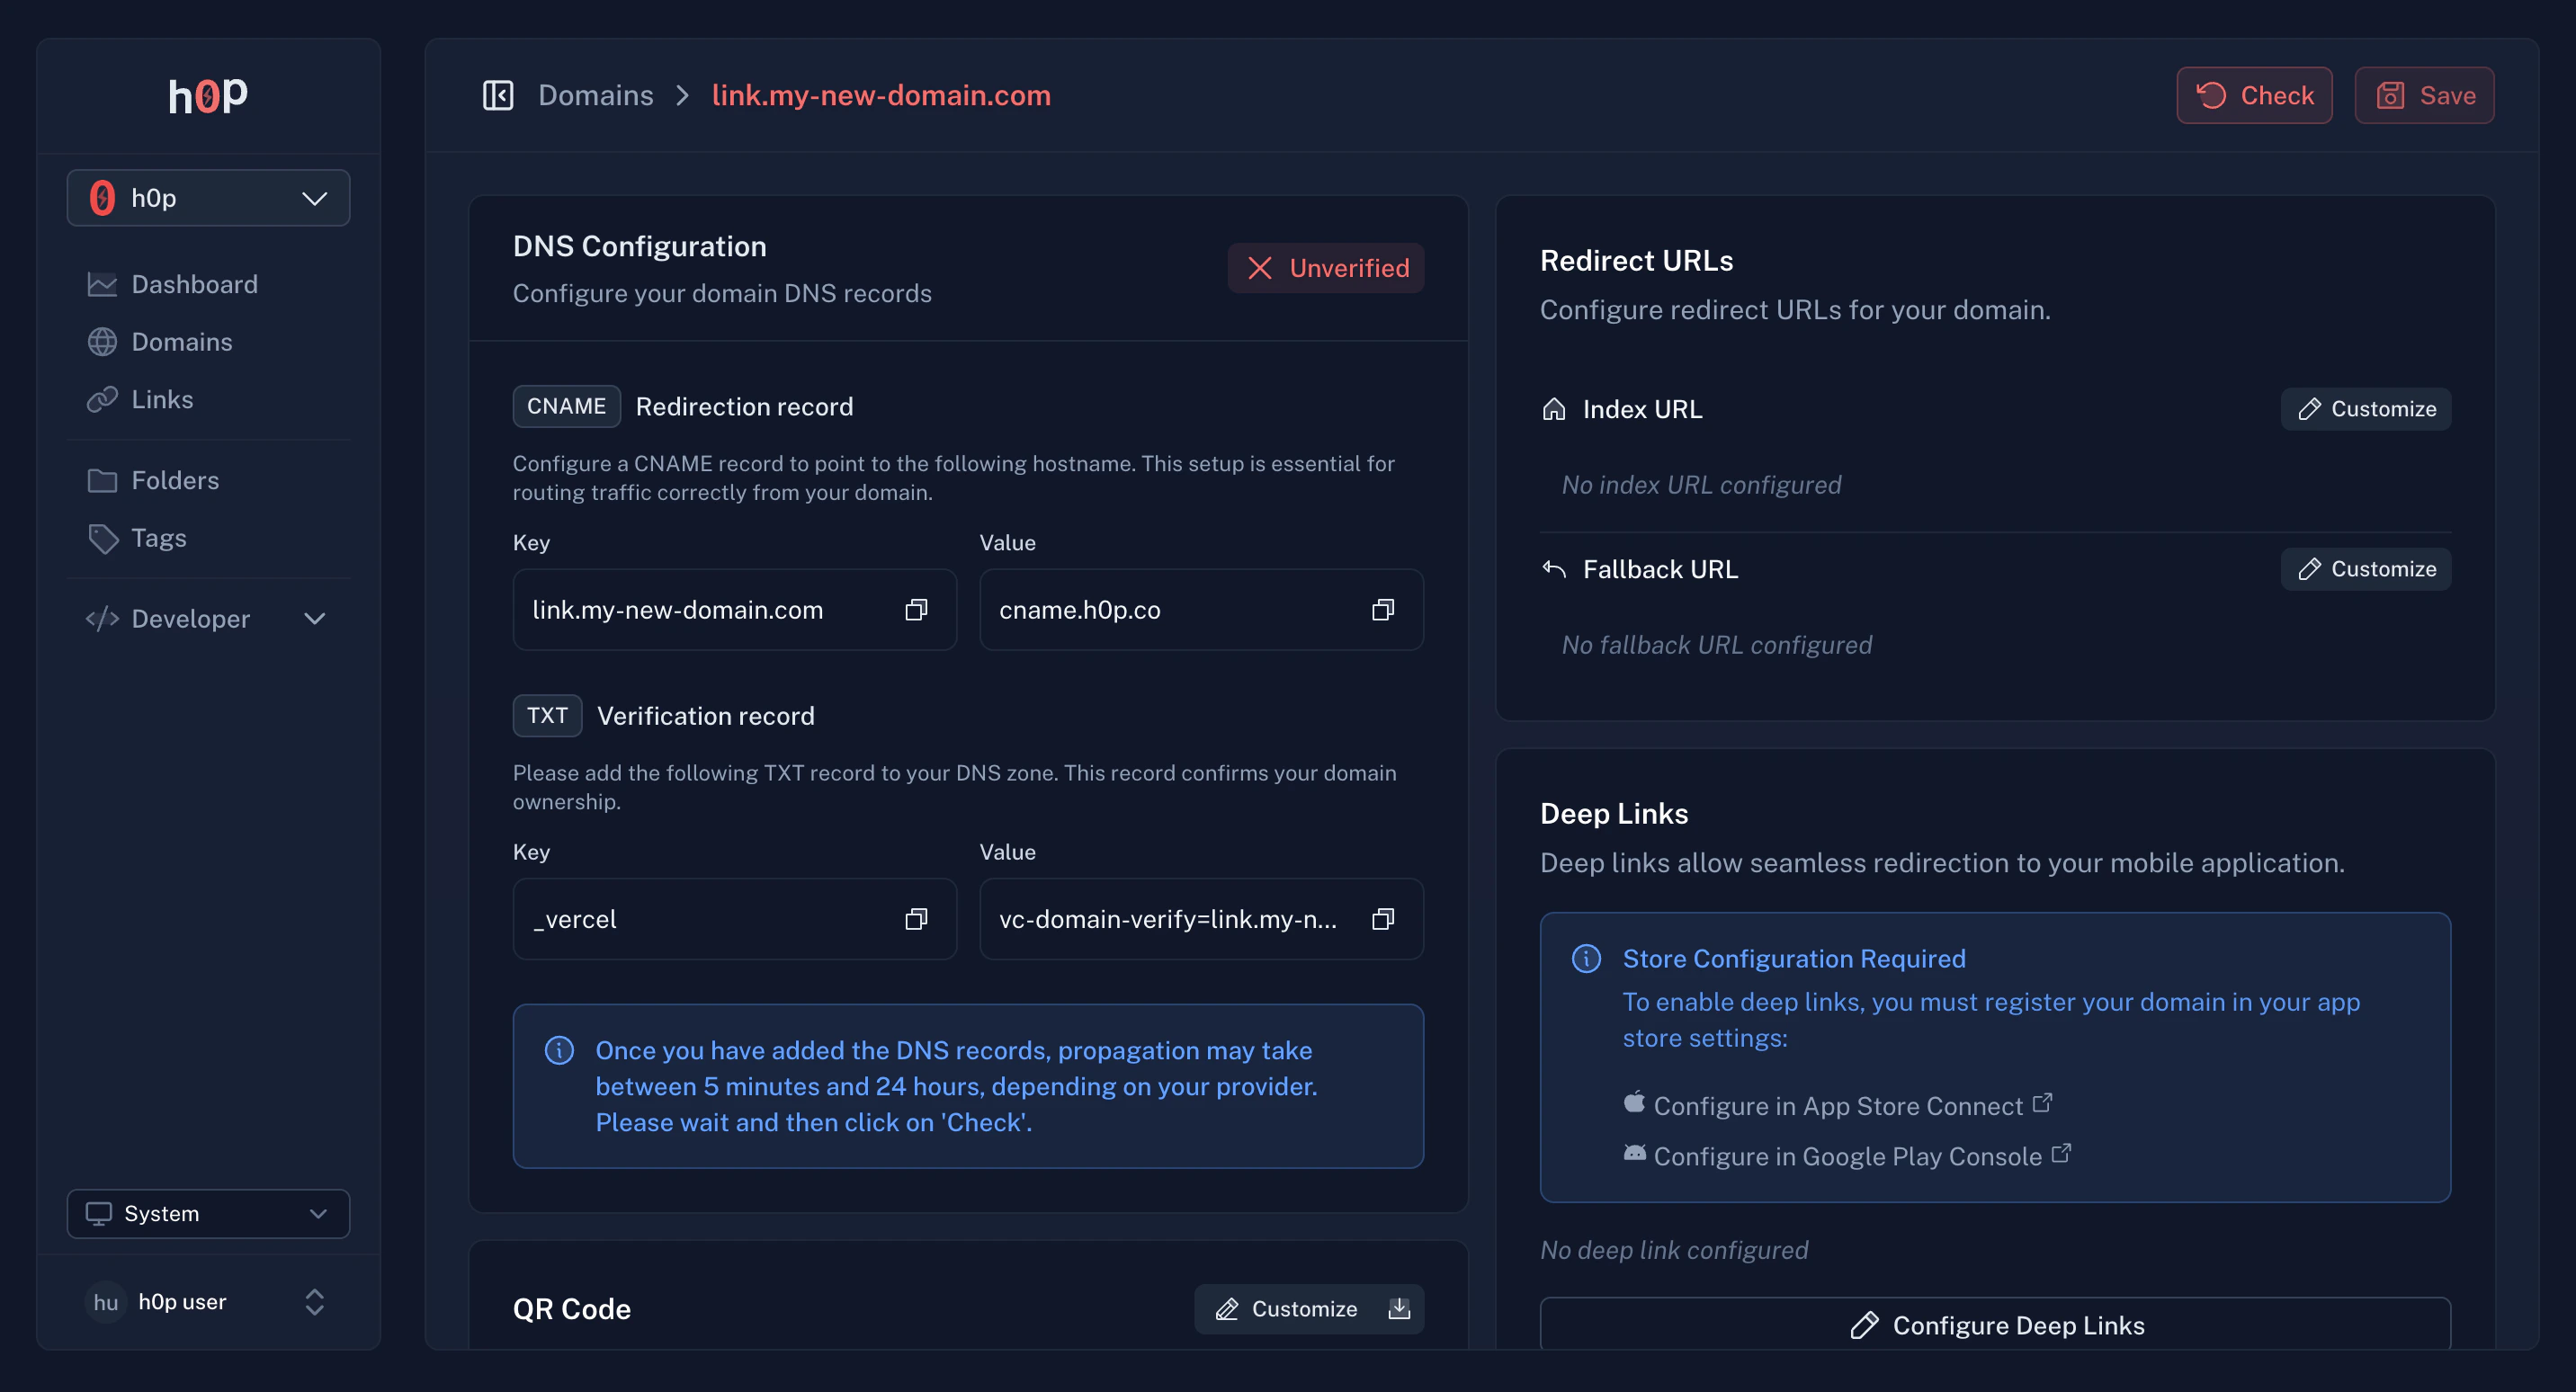
Add a CNAME record in your DNS provider pointing to H0p:
| Type | Name | Value |
| ----- | ------- | -------------- |
| CNAME | `links` | `cname.h0p.co` |
The "Name" field should be just the subdomain (e.g., `links`), not the full domain.
**TXT record for verification:**
In some cases, H0p may also require you to add a TXT record to verify domain ownership. If prompted, add:
| Type | Name | Value |
| ---- | ---------------------- | ------------------- |
| TXT | `_h0p-challenge.links` | `verification-code` |
The exact value will be provided in the H0p dashboard when you add your domain.
DNS changes typically propagate within a few minutes, but can take up to 48 hours.
Click **Verify** in H0p to confirm the DNS is configured correctly.
Once verified, a green checkmark appears and your domain is ready to use.
 ## DNS configuration by provider
1. Log into your Cloudflare dashboard
2. Select your domain
3. Go to **DNS** > **Records**
4. Click **Add record**
5. Select **CNAME** type
6. Enter `links` as the name (or your chosen subdomain)
7. Enter `cname.h0p.co` as the target
8. Set proxy status to **DNS only** (gray cloud)
9. Click **Save**
1. Log into your Namecheap dashboard
2. Go to **Domain List** > **Manage**
3. Click **Advanced DNS**
4. Click **Add New Record**
5. Select **CNAME Record** type
6. Enter `links` as the host
7. Enter `cname.h0p.co` as the value
8. Keep TTL as Automatic
9. Click the checkmark to save
1. Log into your GoDaddy account
2. Go to **My Products** > **DNS**
3. Click **Add** under Records
4. Select **CNAME** type
5. Enter `links` as the name
6. Enter `cname.h0p.co` as the value
7. Set TTL to 1 hour
8. Click **Save**
1. Log into Google Domains
2. Select your domain
3. Go to **DNS** > **Custom records**
4. Click **Manage custom records**
5. Create a CNAME record:
* Host name: `links`
* Type: CNAME
* Data: `cname.h0p.co`
6. Click **Save**
## Domain settings
Once verified, configure your domain settings:
### Primary domain
Your first domain becomes the primary domain. When creating links without specifying a domain, the primary is used by default.
To change the primary domain:
1. Go to **Domains**
2. Click on the domain you want to make primary
3. Toggle **Primary Domain** on
### Index URL (Premium)
Set a destination for visitors who access your domain root (e.g., `links.yourcompany.com` with no slug):
* Redirect to your main website
* Show a custom landing page
* Display a link list page
Without an index URL, visitors see a default H0p page.
### Fallback URL (Premium)
Set a destination for invalid or deleted links:
* Instead of showing a 404 error
* Redirect to your homepage or help center
* Maintain a good user experience even for broken links
## Deep linking
Deep linking requires a Premium subscription.
Configure deep linking to send mobile users directly into your app. This requires setting up platform-specific configuration files.
### Apple App Site Association (iOS)
Enable Universal Links for iOS:
Your iOS developer will provide an App Site Association file. It looks like:
```json theme={null}
{
"applinks": {
"apps": [],
"details": [
{
"appID": "TEAMID.com.yourcompany.app",
"paths": ["*"]
}
]
}
}
```
In your domain settings, paste the AASA JSON into the **Apple App Site Association** field.
H0p automatically serves this file at `/.well-known/apple-app-site-association`.
Test by visiting: `https://links.yourcompany.com/.well-known/apple-app-site-association`
### Android Asset Links
Enable App Links for Android:
Your Android developer will provide an Asset Links file:
```json theme={null}
[{
"relation": ["delegate_permission/common.handle_all_urls"],
"target": {
"namespace": "android_app",
"package_name": "com.yourcompany.app",
"sha256_cert_fingerprints": ["..."]
}
}]
```
In your domain settings, paste the Asset Links JSON into the **Android Asset Links** field.
H0p serves this at `/.well-known/assetlinks.json`.
Test by visiting: `https://links.yourcompany.com/.well-known/assetlinks.json`
## QR code templates
Each domain can have a default QR code style that applies to all links on that domain:
All QR codes on this domain share the same style automatically.
Individual links can still have custom QR code settings.
Configure the template in your domain settings under **QR Code Template**.
## Limits
| Plan | Domains |
| ------- | ------- |
| Free | 1 |
| Premium | 100 |
Your primary domain (h0p.co or custom) doesn't count against your limit.
## Troubleshooting
**Check your DNS configuration:**
* Ensure the CNAME points to `cname.h0p.co` (not `h0p.co`)
* Wait for DNS propagation (up to 48 hours)
* Check for typos in the subdomain name
**Test your DNS:**
```bash theme={null}
dig links.yourcompany.com CNAME
```
You should see `cname.h0p.co` in the response.
H0p automatically provisions SSL certificates via Let's Encrypt. This usually takes a few minutes after DNS verification.
If you see SSL errors:
* Wait 5-10 minutes and try again
* Ensure your DNS is using DNS-only mode (not proxied)
* Contact support if the issue persists
Verify that:
1. The domain is verified (green checkmark in H0p)
2. The link was created on this domain (not h0p.co)
3. DNS is pointing to the correct CNAME
Test by visiting a known working link on the domain.
**For iOS:**
* Verify AASA JSON is valid at `/.well-known/apple-app-site-association`
* Check that your app is configured for Universal Links
* Clear iOS cache and try again
**For Android:**
* Verify Asset Links JSON at `/.well-known/assetlinks.json`
* Check that your app manifest includes the domain
* Test with the Digital Asset Links API tool
## Best practices
`l.company.com` saves characters compared to `links.company.com`. Every character counts in short links.
Avoid using your main domain root for short links. Use a subdomain to keep things organized.
Always configure a fallback URL to handle deleted or invalid links gracefully.
Create a test link and verify it works on desktop, iOS, and Android before using the domain for important campaigns.
## API access
Manage domains programmatically:
```bash theme={null}
# Add a new domain
curl -X POST https://api.h0p.co/domain \
-H "x-api-key: YOUR_API_KEY" \
-H "Content-Type: application/json" \
-d '{"domain": "links.yourcompany.com"}'
# Verify domain DNS
curl https://api.h0p.co/domain/{id}/verify \
-H "x-api-key: YOUR_API_KEY"
```
See the [API Reference](/api-reference/introduction) for complete documentation.
## DNS configuration by provider
1. Log into your Cloudflare dashboard
2. Select your domain
3. Go to **DNS** > **Records**
4. Click **Add record**
5. Select **CNAME** type
6. Enter `links` as the name (or your chosen subdomain)
7. Enter `cname.h0p.co` as the target
8. Set proxy status to **DNS only** (gray cloud)
9. Click **Save**
1. Log into your Namecheap dashboard
2. Go to **Domain List** > **Manage**
3. Click **Advanced DNS**
4. Click **Add New Record**
5. Select **CNAME Record** type
6. Enter `links` as the host
7. Enter `cname.h0p.co` as the value
8. Keep TTL as Automatic
9. Click the checkmark to save
1. Log into your GoDaddy account
2. Go to **My Products** > **DNS**
3. Click **Add** under Records
4. Select **CNAME** type
5. Enter `links` as the name
6. Enter `cname.h0p.co` as the value
7. Set TTL to 1 hour
8. Click **Save**
1. Log into Google Domains
2. Select your domain
3. Go to **DNS** > **Custom records**
4. Click **Manage custom records**
5. Create a CNAME record:
* Host name: `links`
* Type: CNAME
* Data: `cname.h0p.co`
6. Click **Save**
## Domain settings
Once verified, configure your domain settings:
### Primary domain
Your first domain becomes the primary domain. When creating links without specifying a domain, the primary is used by default.
To change the primary domain:
1. Go to **Domains**
2. Click on the domain you want to make primary
3. Toggle **Primary Domain** on
### Index URL (Premium)
Set a destination for visitors who access your domain root (e.g., `links.yourcompany.com` with no slug):
* Redirect to your main website
* Show a custom landing page
* Display a link list page
Without an index URL, visitors see a default H0p page.
### Fallback URL (Premium)
Set a destination for invalid or deleted links:
* Instead of showing a 404 error
* Redirect to your homepage or help center
* Maintain a good user experience even for broken links
## Deep linking
Deep linking requires a Premium subscription.
Configure deep linking to send mobile users directly into your app. This requires setting up platform-specific configuration files.
### Apple App Site Association (iOS)
Enable Universal Links for iOS:
Your iOS developer will provide an App Site Association file. It looks like:
```json theme={null}
{
"applinks": {
"apps": [],
"details": [
{
"appID": "TEAMID.com.yourcompany.app",
"paths": ["*"]
}
]
}
}
```
In your domain settings, paste the AASA JSON into the **Apple App Site Association** field.
H0p automatically serves this file at `/.well-known/apple-app-site-association`.
Test by visiting: `https://links.yourcompany.com/.well-known/apple-app-site-association`
### Android Asset Links
Enable App Links for Android:
Your Android developer will provide an Asset Links file:
```json theme={null}
[{
"relation": ["delegate_permission/common.handle_all_urls"],
"target": {
"namespace": "android_app",
"package_name": "com.yourcompany.app",
"sha256_cert_fingerprints": ["..."]
}
}]
```
In your domain settings, paste the Asset Links JSON into the **Android Asset Links** field.
H0p serves this at `/.well-known/assetlinks.json`.
Test by visiting: `https://links.yourcompany.com/.well-known/assetlinks.json`
## QR code templates
Each domain can have a default QR code style that applies to all links on that domain:
All QR codes on this domain share the same style automatically.
Individual links can still have custom QR code settings.
Configure the template in your domain settings under **QR Code Template**.
## Limits
| Plan | Domains |
| ------- | ------- |
| Free | 1 |
| Premium | 100 |
Your primary domain (h0p.co or custom) doesn't count against your limit.
## Troubleshooting
**Check your DNS configuration:**
* Ensure the CNAME points to `cname.h0p.co` (not `h0p.co`)
* Wait for DNS propagation (up to 48 hours)
* Check for typos in the subdomain name
**Test your DNS:**
```bash theme={null}
dig links.yourcompany.com CNAME
```
You should see `cname.h0p.co` in the response.
H0p automatically provisions SSL certificates via Let's Encrypt. This usually takes a few minutes after DNS verification.
If you see SSL errors:
* Wait 5-10 minutes and try again
* Ensure your DNS is using DNS-only mode (not proxied)
* Contact support if the issue persists
Verify that:
1. The domain is verified (green checkmark in H0p)
2. The link was created on this domain (not h0p.co)
3. DNS is pointing to the correct CNAME
Test by visiting a known working link on the domain.
**For iOS:**
* Verify AASA JSON is valid at `/.well-known/apple-app-site-association`
* Check that your app is configured for Universal Links
* Clear iOS cache and try again
**For Android:**
* Verify Asset Links JSON at `/.well-known/assetlinks.json`
* Check that your app manifest includes the domain
* Test with the Digital Asset Links API tool
## Best practices
`l.company.com` saves characters compared to `links.company.com`. Every character counts in short links.
Avoid using your main domain root for short links. Use a subdomain to keep things organized.
Always configure a fallback URL to handle deleted or invalid links gracefully.
Create a test link and verify it works on desktop, iOS, and Android before using the domain for important campaigns.
## API access
Manage domains programmatically:
```bash theme={null}
# Add a new domain
curl -X POST https://api.h0p.co/domain \
-H "x-api-key: YOUR_API_KEY" \
-H "Content-Type: application/json" \
-d '{"domain": "links.yourcompany.com"}'
# Verify domain DNS
curl https://api.h0p.co/domain/{id}/verify \
-H "x-api-key: YOUR_API_KEY"
```
See the [API Reference](/api-reference/introduction) for complete documentation.